Rubric Example
April 29, 2026Photoshop Lesson Plan Example
April 29, 2026Creating a Brush from a Photograph & Placing a Photograph in Text
- Open Photoshop and choose either a photo of yourself or a medium-to-large photo of a model's head.
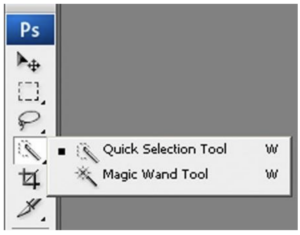
- Using the Quick Selection tool, select the entire head and neck, including the shoulders if you want to.
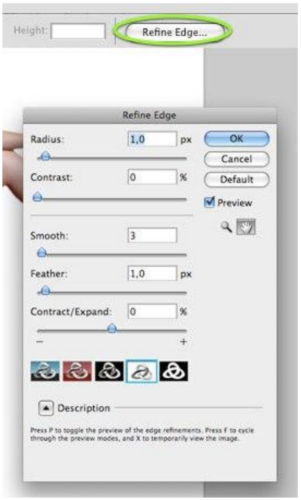
- Choose the Refine Edge option on the toolbar above the document and make changes until you have a selection you like.
- Go to Image_Mode and choose Grayscale

- Go to Image_Adjustments and choose Levels, take the arrow from both the left and right sides of the scale, and move them toward the center to increase the contrast of the image. When the image looks how you want, click ok
- Go to Edit and choose Define Brush Preset – Give the brush an appropriate name and click ok to save it
- Create a new document with the dimensions 11 x 8.5 inches to create a landscape blank page. (If you want to do a portrait design, switch the dimensions to be 8.5 x 11 inches)
- You can test out the new brush you made now if you like. Pressing B on the keyboard is a shortcut for the brush tool, and Control + Z is undo
- Press T for the text tool or select it from the toolbar and type your name in all caps with a thick font of your choice and position it where you like it best
- Open Google Images and find an image to place into your name. It should be medium to large size, just like the model image.
- Open the chosen image in Photoshop and drag the image into the document with your name
- Make sure the image layer is above the text layer and position it where you think it will look best inside the letters. (This is easily adjustable after the next step)
- Hover the mouse arrow over the line separating the image and text layers in the layers palette, hold the option/alt button, and see the mouse change shape. When you get the double-circle symbol, click the mouse to place the image into the text.
- If you don’t like what part of the image is showing, you can move either layer to adjust it.
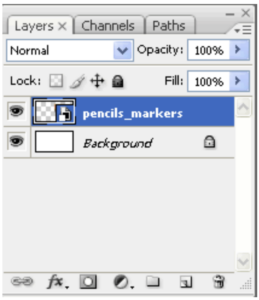
- Create a new layer to use the brush tool on
- Choose the brush again and adjust the size and color. You can either swipe the brush across the page or click once to stamp the image onto the canvas.
- Once again, step 13 may be used with the stamp or brushed-on image to give it a surreal look
- Arrange the elements until you are happy, then save the document as a PSD to make adjustments if you want, and save it again as a JPG to share with friends or family.